Have you jumped on the bacon bandwagon yet? This is an oldie but goody appetizer recipe for Bacon Roll Ups for entertaining to serve on your Charcuterie Board or just watching Netflix at night!
Brunch Bacon Appetizers
This family recipe was given to me and isn't too hard to make. It's almost Keto - or Dirty Keto if you want to ignore the carbs in the bread. OK, it has bacon and cream cheese, so it's good enough for me! Try making it with homemade Sourdough Bread
Tip:
When my mother-in-law owned her cheese and gourmet shop, we would make asparagus roll ups. A tip was to cut off the crusts of the bread, and in a single row, place between two pieces of very wet paper towel for awhile. This would moisten the bread, and make it easier to roll up, without it crumbling.
Check out other delish finger food appetizers here
These are the perfect luncheon or finger food to serve for that special event like Kentucky Derby Party, Mother's Day Brunch, parties on the deck or evening get-togethers to watch the summer sunset.
1 to 1-1/2 loaf of white bread (or soft bread of your choice)
1 big cream cheese (about 8 oz)
1 package of bacon
Instructions
Cut the crust off the bread and cut in half. Cut the bacon into small enough pieces so this wraps around the bread. Spread cream cheese on bread and roll with bacon. Keep together with a toothpick.
Bake on 400 degree oven for about 15 to 20 minutes or until bacon is done.
The meld of flavors in this citrus Pineapple Cream Cheese Ball is perfect for summer dining on the deck or poolside.
You'll be surprised, and wouldn't think that these two flavors, pineapple and onion, go together, but the taste is amazing! It's the perfect addition to your Charcuterie Board.
I first had this Pineapple Cream Cheese Ball at a graduation party at my sister-in-laws many years ago. I tucked the recipe away and am giving it ago this season!
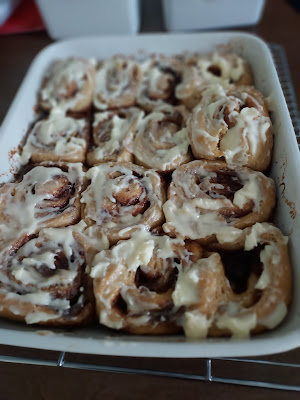
Since starting to make Sourdough Bread Recipes, I've experimented with moving on to make desserts. These Sourdough Cinnamon Buns with Cream Cheese Icing turned out delicious the first time I made them.
I'd been looking for a good, easy Cinnamon Bun recipe and found this one from Ultimate Food GeekBen Starr YouTube channel.
In his food video, he also gives excellent tips for using, making and maintaining Buttermilk, which is used in this Cinnamon Bun recipe. That's the secret ingredient for rich-tasting Sourdough Cinnamon Buns!
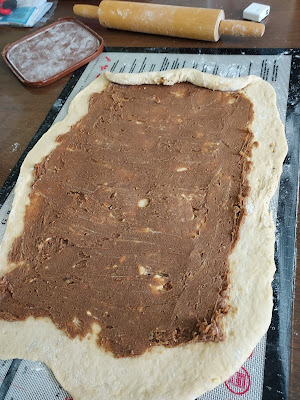
One reason I like this Cinnamon Bun recipe is it's a no-knead recipe. I wait for the dough to rise, stretch it out and spread the buttery cinnamon mixture. It uses a lot of butter, but comes together easily with a fork.
Cream cheese icing or frosting has always been a favorite of my family on Carrot Cake, so I loved the idea on Cinnamon Buns!
Now I don't have to get store-bought buns that are loaded with chemicals and preservatives I can't pronounce. Sourdough is also gut healthy.
If you're ready to try your hand at making Sourdough recipes but don't know where to begin, check out Ben Starr. I've also joined a few great Sourdough Facebook Groups, but Ben Starr is really a great no-nonsense chef. There's so much disinformation on some of those groups, you just have to scroll by and sort out what makes sense and works for you.
I like to share my bakes with my family and friends!
8oz / 227g sourdough starter (at 100% hydration...ideally unfed, straight from the fridge)
6oz / 170g buttermilk (any type)
2oz / 57 g (half a stick) unsalted butter, melted
2oz / 57g brown sugar (light or dark)
1 egg
1 Tablespoon vanilla extract
Stir/whisk until smooth. Then add:
1 pound / 454g all purpose flour (or bread flour)
Stir with a fork, then finish mixing with your hand until you have a cohesive smooth dough. (A few seconds is generally sufficient.) Grease the bowl, cover tightly, and rise at least 12 hours, up to 24 hours...only longer if it takes that long for your starter to double the dough.
1 tsp coarse or kosher salt (or 1/2 tsp fine or table salt)
2 Tablespoons cinnamon
Mash with a fork until well blended.
Generously flour the work surface, hands, and rolling pin. Remove the dough to the work surface, gently stretch into a rectangle shape, and gently roll out to 16-18" long and 12" wide (40-46cm x 20cm). Distribute globs of the cinnamon/butter/sugar mixture across the dough, and spread the mixture evenly across the rectangle, leaving a 1" border around the bottom and sides, but spreading the mixture almost to the edge of the top. Roll from the top edge down, carefully, ensuring a tight roll. Moisten the bottom edge of the dough, lift it up to meet the roll, and pinch to seal it well.
Using dental floss, fine kitchen twine, or a bread knife, cut an inch or two off each end of the log to even it, then divide the log into as many rolls as you wish to make. (12 is ideal, but it can be divided into fewer rolls for taller rolls, or more rolls for shorter rolls.)
Place the rolls into a greased heavy pan (pyrex, ceramic, cast iron are ideal, and I use a 10.5" x 14.5" pyrex). Rise 1 hour.
(If refrigerating overnight, after cutting, cover and immediately place rolls in refrigerator. Transfer them straight to the preheated oven to bake.)
Bake on the center rack of a preheated 325F / 160C oven for 35 minutes, rotating after 20 minutes. Gently brush with a small amount of frosting or soft/melted butter immediately after removing from oven. Let cool at least 15 minutes before final frosting, and serve.
If baked in advance, warm cinnamon rolls in a 300 degree oven for 10 minutes before serving.
Since I like to use my crockpot, I'm taking advantage of cooking in a crockpot by planning ahead and putting together some crockpot freezer meals such as this recipe for Freezer Crockpot Beef Stew.
Crockpot Freezer Meals
When I transferred to a new city for my full-time job, I didn't have the convenience of being able to stop by a grocery store during lunchtime to pick up a few things for that evening's dinner. I turned to my trusty slow cooker.
Here are some terrific dump crockpot recipe to simplify and make meal prep easy during hectic times. I use my Foodsaver Vacuum Sealer to freeze ahead and dump in the morning on those busy days.
Serve with some delicious homemade Sourdough Bread recipe (it's easier to make than you think) and gut-healthy too with all of the probiotic properties.
Crockpot Beef Stew
Beef prices have risen recently because of the high cost of gas and transportation. Rather than buy sirloin tips for my stew, Shoulder London Broil was on sale this week, so I bought several steaks and cut them up and cubed them myself at home.
Whether you're a stay at home mom, or work part-time or full-time outside the home, it's hard to get your home organized. Even if you're a grandmother, you might be thinking you have it all covered at home since your pantry is organized immaculately and everything in your kitchen has its place. It doesn't change the fact that you're still busy working all day and driving kids or grandchildren to practice, running errands or taking care of your household in the evenings. Another thing you can learn to do to simplify your life is to plan your meals and cook in advance.
Meal planning and bulk cooking are both wonderful techniques you can utilize and modify to fit your families needs. The idea behind this is simple. The principle is that you cook and or prepare your meals ahead of time and then preserve them by either freezing refrigerating them. It can also help stretch your food budget dollar further, since you can cook one large meal and get two or three other meals from it with the proper planning.
Start by writing down a list of your favorite meals and plan on preparing a grocery list that will coincide with your menu. Since you're learning to cook in bulk, your shopping list will have to change accordingly so you're sure to have enough ingredients on hand when the time comes to do the cooking.
The most important tool in meal planning and bulk cooking is your freezer. Freezer bags are a great space saver if you have a small freezer. You can fit many in the same space of a few storage containers. Be sure to incorporate lots of quick and easy meals that your family can warm up and serve themselves in the event you're not able to be at home for dinner or you just need to grab something that's quick.
You'll also learn to love your slow cooker. Experiment with different recipes and variations on your favorites. They also make easy work of cooking whole chickens or roasts which can be frozen or refrigerated for later use very easily.
You're only limited by your own imagination when cooking in bulk for the week ahead. Factor in the time you save by not having to do a lot of after dinner cleanup or dishes, Whether you're cooking for one, or cooking for a family, you'll be glad you took the time to simplify your life and master this important organizational skill.
3 c. chopped onions
2-1/2 c. coarsely chopped green bell peppers (about 2 peppers)
2 c. fresh green beans, diced
2 cups of baby carrots or diced carrots
4 cloves garlic, minced
2-3 lbs. beef stew meat, cut into one inch cubes, or whole and you can cut it after it's cooked
4 (6-oz.) cans tomato paste
2 Tbl. of Hungarian paprika or regular paprika
1 tsp. ground black pepper
4 c. hot cooked wide egg noodles, do not add in freezer bag, cook separately, day of cooking
1/2 c. dairy sour cream, do not add in freezer bag, use as garnish on the day of cooking
Transfer everything into two gallon freezer bags, shake it up, seal, label and put in the freezer. DO NOT add the sour cream and noodles as the sour cream is for garnishing after the meal is cooked. Cook the noodles separately according to package directions on the day of cooking.
On the day of cooking, dump bag contents into your crock pot and cook on high for 4 to 6 hours, or low 6-8 hours, depending upon your specific slow cooker.
Most everyone enjoys a Pizza Night! Make your own at home with this Easy Breadmaker Machine Pizza Dough Recipe.
Eating out is fun, but getting expensive. Even a take-out pizza is costly when you add extra toppings.
Homemade Pizza Crust Dough
Years ago, my late aunt would spend all day prepping meals, and send me home with her homemade Pizza Dough. I used to make homemade pizza with it until she passed.
Now we are empty nesters, and sometime just want to stay home, but still enjoy pizza. I've had a bread machine for years, so am making my own again. I also have yet to try a Sourdough Pizza Dough recipe, but it's planned for my meal rotation.
Breadmaker Machine Pizza Dough
This recipe can made several different sizes, depending if you cut it into portions. This is for 2 large pizzas. I got the perforated pizza pan on sale at Aldi. I do have a Pampered Chef Pizza Stone I will making this DIY Pizza crust on next.
I have a Regal Kitchen Pro Bread Machine that is so old I can't remember when or where I bought it. It's held up well, even though it doesn't have all the bells and whistles the newer ones do, but does have a dough cycle. The dough cycle on this bread maker lasts around 90 minutes.
The bread maker pizza dough can be frozen when placed in a zippy bag, sprayed with olive oil, or oil of your choice.
Use your favorite toppings (I bought one pound of lean ground beef, but only used 1/2 pound that I pre-cooked.) But Italian Sausage is next on my list. I also topped with sauteed sliced mushrooms. I pre-cooked the mushrooms, placed on paper towel, and then froze the remainder in my Foodsaver Vacuum Sealer bags for the freezer to be used on the next pizza.
We enjoyed this on Super Bowl Sunday, and had enough leftover for lunch the next day! Top with your favorite sauce, or try this Homemade Pasta Sauce - Red Gravy recipe
Bread Maker Pizza Dough
2 cups water
2 tbsp olive oil - I use extra virgin olive oil
2 tsp salt
6 cups (27 oz) flour - I use bread flour but all-purpose flour works just as well, or add some Whole Wheat flour
4 tsp Instant Bread Machine instant yeast
(Garlic Powder, to taste, will take this dough to a new level)
Bake at pre-heated 425° oven for 15-25 minutes depending on crust thickness


.jpg "DIY Pizza Crust Dough | Breadmaker Pizza Dough Recipe | Bread Machine")

.jpg "DIY Pizza Crust Dough | Breadmaker Pizza Dough Recipe | Bread Machine")
.jpg "DIY Pizza Crust Dough | Breadmaker Pizza Dough Recipe | Bread Machine")
.jpg "DIY Pizza Crust Dough | Breadmaker Pizza Dough Recipe | Bread Machine")
.jpg "DIY Pizza Crust Dough | Breadmaker Pizza Dough Recipe | Bread Machine")
